Ok, this cap on the right is about as bad as it gets. This isn't even a
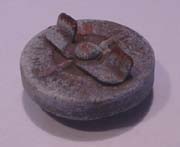 gas
gas cap - it's a #@$!ing radiator cap.
This handy accessory came on our project '64 Deluxe and has obviously been in use for a long
time. Yeah, it fits but it's butt ugly and it's not vented like an actual gas cap should be.
We shot this picture just before hurling it in the trash. Buy a new
gas cap, or an original one
at a swap meet, but don't use a radiator cap! Nuf said.
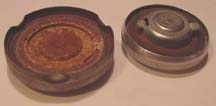
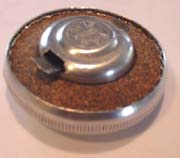
Original gas caps are easy to spot,
with their big embossed "VW" stamped on the top. But the problem is that
bug and bus caps look a lot alike, so when you're cruising the swap meets you want to make sure you
buy the right cap. In general, bug caps are a larger diameter than bus caps (bug caps are around
2 7/8" in diameter and splittie bus caps are around 2 1/2" in diameter). The next thing you'll notice
is that bug caps are a whole lot easier to find than bus caps! Seems like every vendor has a couple bug
caps laying around but you'll really have to search to find a
bus cap. The easiest way to tell
a bug cap from a bus cap is to flip it over and check out the underside. In the picture here,
the large cap on the left came off a '63 bug. Notice that it's held on the filler neck by the
3 indents you see along the outside edge of the cap. As a contrast, notice that the bus cap
on the right is smaller and it attaches to the filler neck with the 2 tabs sticking out of
the bulge in the center of the cap.
Here's another picture contrasting the sizes of bug and bus
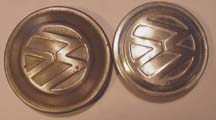
gas caps - the bug cap is
on the left and the bus cap is on the right. It's hard to say why decent original bus caps
have become so much harder to find than bug caps. But, swap meet vendors are hip to the
scarcity of decent bus gas caps, so they price em accordingly. Decent original bug caps
can often be had for $5, but I've seen vendors asking $20 to $40 for a decent original bus cap!
Believe me, I'm not trying to set a pricing standard here, I'm just trying to prevent you from
having sticker shock when you go looking for a nice original bus cap. There is some good news
here though. If you're on a budget and willing to search and haggle, you can usually find an
ok bus cap with dents for 5$ to $10, then read on here, for tips on how to restore your bargain find!
If you found a pretty nice cap, with no dents and few scratches, skip this step and go down to the
final paragraph, because what we're about to embark on here is hard on a cap, and you're better off
leaving a nice cap alone. But if the top has an ugly dent or two, it's time to dig in and repair
the damage. The first rule here is
NEVER IMMERSE THE CAP! If it's dirty or oily,
use a rag dipped in degreaser or paint thinner to scrub it clean, but
avoid the temptation to drop the cap in a can of carb cleaner or paint thinner or whatever.
There's a fragile "wafer" gasket inside the cap and immersing it will soak this gasket and cause it
to separate and fall apart. Ok, so in the first picture you see the underside of an original bus cap
(sorry we didn't take a picture of the ugly/dented top,
before we started, but trust us -
it looked like someone had sat on the top!). The cork gasket here is a new one, but your's will most
likely be very flat and worn, or missing altogether. The first step is to pry out this gasket.
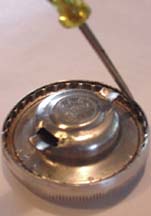
Now comes the tricky part. Lay the cap upside down on a clean towel and using a small screwdriver,
pry between the inner crimped plate and the outside edge (see picture number 2). You want to pry the
handle outwards, because if you pry inwards the end of the screwdriver will make permanent dents in the
scored outer edge of the cap. As you pry, the
soft aluminum outer edge will bend outward a little, and the inner crimped lining will bend inwards.
Just bend a little and move on to another spot. Keep doing this around the crimped edge until
you've gone a little more than half way around. Go back and slightly pry here and there until the
crimped edge is evenly bent and looks like it'll clear the bent-out outer edge of the cap. Now you should be able
to carefully pry the inner plate up and out of the cap (when doing this prying, don't dent the outer
edge and don't stick the screwdriver too far under the crimped plate or you'll gouge the wafer
gasket under it). In the third picture, the inner plate is almost completely out. The outer edge
is pretty wavy; but don't worry, we'll fix this later. In the last picture we've wrestled the
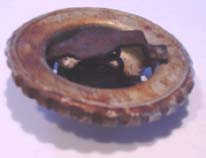
inner plate out of the cap and flipped it over. You can now see that the two "tabs" are actually
one piece of steel that is held in place by a large spring (larger diameter sits on the aluminum
plate while the smaller diameter pushes against the steel "tab" bracket). You can also see that
we've released one "tab" by pushing down on the bracket to depress the spring, and slid the bracket
towards one "tab" so the other one can be pulled out of its slot in the aluminum dome.
Now take note of how everything goes together, and disassemble everything (including the fiber
gasket between the cap and the inner plate) for a thorough cleaning. Paint thinner is fine for
removing grease, oil and enamel paint. Use Lacquer Thinner to remove lacquer paint. If you've got
baked on grease and crud that just doesn't want to come off, try #0000 steel wool. If the steel wool
doesn't work, use a wire brush. The aluminum cap is soft so you need to be careful to not
make deep scratches - the trick is to always brush or rub back and forth in
ONE
DIRECTION (choose one of the legs of the 'W' in the 'VW' logo as a reference and brush
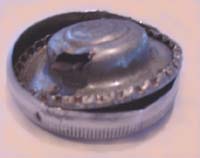
back and forth, always parallel to this leg). Once the top is looking good and the "big chunks"
are gone, it's time to work on the dents. This is a lot like pounding out dents in a fender
except the metal bends a whole lot easier and you'll need a "tool" that's small enough to fit inside
the width of the embossed VW logo so you can push and pound very small areas. For this cap,
we made a pounding "tool" by cutting & filing a piece of wood to be about 1/8" by 1/4" by 3" long.
Examine the top of the cap to find a "pushing-in" area. If it's a large diameter dent, pick the cap
up in your hands and try popping it out by by placing your thumbs on the bulge and pushing
outward. If this doesn't work, flip the cap over, lay it in a
clean/smooth block of wood and use the "tool" and a hammer to gently pound the "pushed-in" area back
into shape. Just pound a little at
a time, flip the cap right side up again to see how you're doing, flip it over again and pound
a little more. You get the idea. The main thing to remember her is that aluminum is very soft
and the cap will pound out easily, so go slow and gentle and check your work often, so you don't introduce new dents!
When you've got the dents removed, gently wire brush or steel wool (still going in the
same direction) to make sure you're "done". Clean all of the other metal parts thoroughly
(the "tabs" bracket will probably need some serious wire brushing) and then rub them with the
steel wool until they have a nice shiney luster. Now time for re-assembly. Put the wafer gasket back
in the underside of the cap (puffy side against the aluminum, like it came out) and reassemble
the "tabs" bracket and spring back into the inner plate (larger diameter sits on the aluminum
plate while the smaller diameter pushes against the steel "tab" bracket). Now gently work the inner plate back inside
cap so the section of pryed-in crimping alligns with the pryed-out edge of the cap. Now lay the cap,
logo side down, on a clean towel, apply pressure on the inner plate with one hand while you use the
small screwdriver in your other hand to push the bent crimping back against the inside of the cap
edge. Keep working around the crimping pushing it out a little at a time until it's even and looks
like the
un-molested section of crimping. Don't push too hard with the
screwdriver or you'll flare out the edge of the cap even more than it was before.
If you scratch up the smooth ring around the center
bulge next to the crimping, don't sweat it because it'll be covered by the cork ring gasket.
To bend the edge
of the cap back in place, set it on edge on the towel and gently tap a flared portion back in place.
As always, do a little at a time, stop and examine the "roundness", and then move on to another section
and lightly tap there. Be patient. Eventually it will look pretty good - besides, it's hard to
see this edge when the cap is in place, so just get it round and even all the way around.
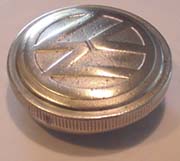
This is the finished product.
There are still some surface pits in this one, but there's not much we can do about it. To get this final luster, start with
#0000 steel wool and rub back and forth (again, in just one direction - like parallel to one of the
legs of the "W" in the "VW" logo). If your surface is in good condition, this'll do it. But
if you have some major scratches or pitting, try wire brushing (in the same direction back and forth)
to slightly remove some metal so the flaws tend to disappear.
If this still doesn't work, get a piece of 120 grit sand paper, wrap it around a block of wood and
sand back and forth (still in the same direction!) over the problem areas. Don't sand too much -
aluminum is soft - and check your progress often. You'll reach a point where it's good enough. At
that point do a final pass with the wire brush and then finish up with the steel wool. That's all
we did to the cap in the picture here, but if you want to go crazy you could then shoot the cap
with a couple coats of Krylon "clear" and/or give it a coat of wax. To complete the project, order
a new cork gasket from one of the usual suppliers.