I'd been looking for an un-molested bus to restore for several years. I finally found an
honest '67 kombi and excitedly drove it home. I've never been a big fan of the "large window"
post '63 buses, and this one had a little rust, but still it seemed like a good candidate
for restoration. Unfortunately, as I started removing the layers of old paint, I discovered that the rust
issues were a lot more extensive than I had thought, so I decided to sell the Kombi to a friend who
was more willing to tackle the rust than I was. The search for a clean project bus began again.
I was beginning to think that all the restorable buses were gone. Then one Sunday, while cruising
the Pomona meet scrounging for parts for my '66 bug, I spied a homely Kombi sitting off by itself.
It was lowered and coated with splotchy paint and primer, but it had a "For Sale" sign in the window, so
I walked over to check it out. At first I thought it was just another funky beater bus, but
then I noticed the old school "sub hatch" in the roof which meant that this tired bus had started
life as an original Westfalia Camper! I started to get excited, but then my heart sank when I
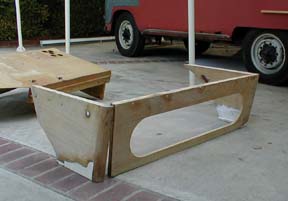
looked through the windows and discovered that the original beautiful wood
Westy interior had been stripped out long ago, leaving just a torn-up "Z-bed" surrounded by
bare primered and rusty walls.
At this point this POS bus didn't seem worth any more of my time, but as I walked around checking out the body
I noticed that the nose was solid, the sides of the body
were amazingly straight and the cool "outward" engine louvers were not bent and wavy
like every other project bus I had looked at. I was also impressed by how solid and unrusty the
underside of the bus was. But the best part about this tired relic was
that it was a '61 so it had the small rear window, front "bullet" blinkers and tiny round tail lights
that I had been hoping to find. Now I was hooked.
I excitedly convinced my wife that this eyesore could be a very cool camper
someday, so she gave her approval and the seller and I sealed the deal later that afternoon.
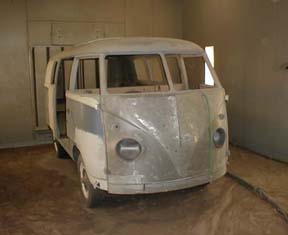
Once I got the Westy home, I couldn't wait to tear into it, but as I walked around the primered
hulk making mental notes about what needed to be done, I got a bad case of "buyer's remorse". The
engine ran, but just barely (I gave it negative points for the after-market "degreed pulley"),
so it would for sure need to be rebuilt. I found some serious rust in the roof in several places -
with a very troublesome spot in the curved corner of the roof above the driver's seat.
But the most disappointing part of this bus was the empty interior, that
used to be filled with classic 60's birch plywood paneling and cabinets installed by Westfalia.
Now the bare metal was rusty and riddled with holes everywhere, drilled for who knows why, and the only hint
of this Kombi's once proud life was the sub-hatch that Westfalia had cut in the roof
as part of the original conversion from empty Kombi, to classic SO23 Westfalia Camper.
The more I thought about this project,the more I realized how difficult it would be to build and
install all the paneling and cabinets required to make this bus a camper again. I finally decided
that the most practical thing to do was to have the sub-hatch opening welded back up,
install standard bus bench seats
and restore it as a plain Kombi. I bounced the idea off my Wife and she quickly told me I was
crazy. In a rush of emotion she explained how she had always wanted an older Westy camper. She
argued that this was once a Westy, so it should
stay a Westy.
She obviously had a lot more confidence in my
wood-working skills than I did, but she really felt that I would be able to build the cabinets and
other pieces to turn this sad bus back into a vintage Westfalia camper. Her enthusiam was infectious, but
I still had some serious doubts, so I just ignored the bus for a while. Several weeks later, fate
stepped in, when we found a guy at an Octo meet in Huntington Beach who was selling the remanents of the original
camper interior that came out of his '57 Westy that he was restoring.
It was really just a pile of water-stained and
delaminating plywood pieces providing a home for a family of black-widow spiders,
and the seller was asking a ridiculous price, but it
was an original
SO23 Westy interior and I thought that maybe some of these pieces were still useable.
When I got home and started digging through this pile of vintage firewood,
my first thought was that I had gotten screwed, once again.
But as I carried pieces out to the bus, and started loosely fitting them into place, an idea suddenly hit me.
Although few of the pieces were decent enough to be re-used, they were mostly solid enough to be used
as
patterns for new pieces. I also realized how lucky I was that most of the original
hardware
(hinges, latches, plates, etc.) was still attached to these parts. So that was the plan - use these
old wood pieces as templates for new pieces that I'd make myself.
But for now, the interior cabintery would have to wait. The first major task was to get the bodywork
and painting done. Dents had to be pounded out, all of the rusted areas in the roof and rain gutters
had to be cut out and replaced with new metal, and all of the hundreds of !&#*ing extra holes drilled in
the interior had to be welded up and ground smooth.
To simplify the bodywork, I removed as much of the interior as I could, and I also pulled out
the gas tank and the engine. I had found a bodyshop willing to tackle the project, so I towed the
shell to their shop. We discussed what needed to be done and I left feeling pretty confident that
they understood the level of quality I was looking for. But, after 6 months sitting in their shop, the bus
was basically untouched, having been sidelined for more lucrative "insurance jobs". I could see that
this was goin' nowhere, so I towed the bus home and pondered my options.
Luckily around this time I heard about a small shop in the City of Orange, owned by Larry Cambra.
Larry's a hot rod guy but he was very interested in the project and assured me that he and his brother
Ron could do the quality work I was looking for. Following Ron's advice, I towed the bus
to Blastech in Orange, to have the layers of paint, rust and bondo blasted away with
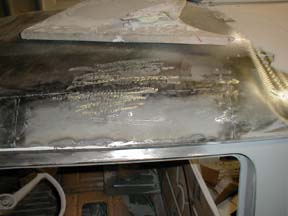
walnut shell media. The blasting revealed a pretty sound and rust-free body, below
the rain gutters, but we found that the gutters and roof had a lot more issues than we had expected.
There was a lot of rust
in the gutters,
a large rusted out area in the front roof and it looked like someone had walked across the roof leaving
several large dents! Several of these flaws had been poorly repaired by someone
a long time ago, and some of these hack repairs had actually contributed to the rusty condition of the roof
and gutters. At this point
Ron suggested I start thinking about a whole "roof transplant"! I started
looking for a donor bus and finally located a wrecked
small window panel in a desert junkyard.
This relic had the ever-popular "radiused" rear wheel wells and was beyond saving,
but fortunately it had a decent roof. In sweltering desert heat, I trailered the
panel back home. At first Ron suggested that we swap out the entire roof, including the
gutters, but eventually we decided it would be less work to cut up the donor bus and just replace the
rusted out areas on the Westy. Larry and Ron cut out the necessary panels and gutter sections
from the donor bus and
expertly edge-welded them into the Westy's roof. The end result was flaw-less! Now that the welding
was done, Larry and Ron turned the project over to their painter; Joe Casteñada, to begin the tedious
skim-coating, priming and sanding phases.
While Larry, Ron and Joe continued to smooth and prep the body, my wife and I started discussing
possible paint colors. At first we were going with the period correct Mango Green & Seagull Gray scheme, but
finally decided on the classic early bus Sealing Wax Red & Beige Gray combo. Roughly 90% of the Westfalia
campers produced during this era came in Sealing Wax Red & Beige Gray so this color combination isn't
exactly rare, but we're
really glad we went with the red and gray colors. The next problem was how to find the correct
shades of Sealing Wax Red and Beige Gray. You see lots of buses painted in these colors, but each bus
seems to be a slightly different shade, so what's
really correct?
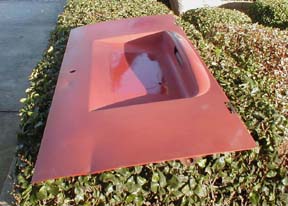
Fortunately I found an old engine lid still coated with it's original Sealing Wax Red paint.
This paint was faded and dirty, but when I pulled off the old license plate, to my amazement I found
beautiful virgin Sealing Wax Red paint, still bright and shiny, having been protected from the elements
for the last 45 years! Using this patch of original paint, Larry and Ron were able to mix up a batch
of 2-stage DuPont Chroma paint. An original Westy in this color scheme would have a
Sealing Wax Red interior,
but we were going for a more "deluxe" look, so we decided to have the interior shot with the
Beige Gray instead. Now that the paint decisions were done,
I could turn my attentions back to the interior.
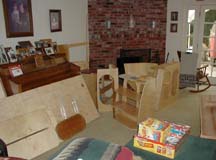
After pulling apart some of the old cabinets and examining their construction, I started searching
local Lumber yards for the plywood sheets I would need to reproduce the interior.
I was not able to find a source for the "lumber core" materials that were originally used by Westfalia to construct the cabinets and paneling, but I did find some quality Baltic Birch plywood at Austin Hardwoods in
Santa Ana, that would work just as well.
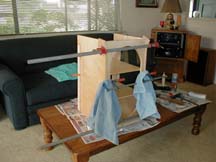
As I started cutting out the new pieces in my home garage I got more and more
excited as I realized that I really
could reproduce an original Westy interior!
Some pieces required careful
hand work with chisels and files, but most of the cabinet parts were flat panels that could
be created with my router and old 10" Craftsman table saw. For sure, the hardest part of building
the new
cabinets was carefully applying the thin veneer strips that hide the plywood's edge grain.
The hardware pieces that came
with the
old cabinets didn't look like much at first, but were definately restorable.
The solid brass hinges and latches I buffed to bring back the original luster and
then I shot each one with several coats of Krylon "clear" to preserve the shine.
I took the the support plates
and "Z-bed" hardware to EMBEE Powder Coating in Santa Ana where Jim and Dave powder coated the parts
in a gloss "medium tan" color that closely matched the original finish
still visible on some of these parts. On original SO23 Westfalia
cabinets, each oval wooden cabinet door is edged with an extruded aluminum frame, that is formed to match
the oval shape of the door. Fortunately, the old "pattern" cabinets still retained their original
aluminum frames. The 45 year old gold finish on these frames was scratched and faded
but EMBEE
applied a satin gold anodized finish that closely matched the original anodized finish.
To finish the
woodwork, I spent hours hand sanding each surface, then carefully brushed on 2 coats of clear McCloskey satin
Urethane
(24 hours apart). I sat the freshly coated cabinets in the living room to keep dust from settling
in the wet finish (I have a very understanding wife!). Once the pieces were thoroughly dry, I block-sanded them
to blend in the brush marks. Next I tacked all these pieces to get rid of the
sanding dust and applied a final coat of
McCloskey Urethane with an aerosol can. After letting this coat dry for a week, I finish sanded everything with 2000 grit paper. Finally, I applied a coat of paste car wax to end up with a
smooth luster slightly shinier than semi-gloss,
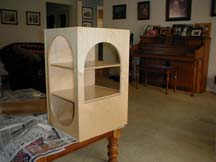
which I believe closely matches the original Westfalia cabinet finish. The finished cabinets are
very similar to the original Westfalia SO23 layout, but I did deviate in several areas to make the interior
more functional. I have never used a full-sized closet when camping (I have a hard enough time hanging
up things at home), so I built the side closet at only half height. This lower cabinet still sports
a closet pole for hanging short items, and is finished with a functional counter top,
but its lowered height allows an unobstructed view out the side window.
The other change I made was to reduce the depth of
the rear ice box cabinet, so it wouldn't block the view out the back window. I finished the interior
of the ice box with gloss-white laminate and also crafted a cross-hatch teak shelf to fit inside.
Fortunately, the rubber gasket around the old cabinet's ice box door was still usable.
Back at Cambra's body shop a few weeks later,
Joe was just finishing the final coats of paint. Once the paint was dry,
Larry and Ron trailered the Westy back to my house. The paint wasn't dry enough for color-sanding yet,
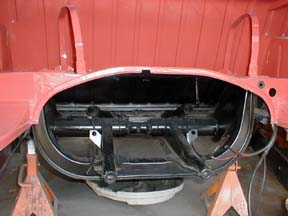
so I put jack stands under the back of the bus to work on the rear end. I pulled the transmission
and sent it out to Rancho Transmissions, where Mike Herbert did a full rebuild and upgraded it to "freeway-flyer"
gears. While the trans was at Rancho, I detailed the engine and transmission area in preparation
for final assembly. I had Joe paint the engine compartment at the same time he painted the rest of
the bus, but there was still a lot of detail work that needed to be done.
I also installed a new wiring loom from Wiring Works, replaced the shift rod
bushings and installed new shocks, brake shoes, wheel cylinders and emergency brake cables.
After I installed the rebuilt and detailed transmission back in the bus, I turned my attentions
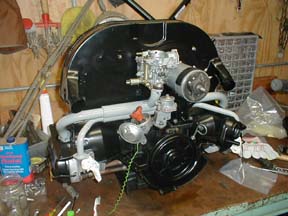
to the engine. The original 36hp engine was long gone and replaced by a previous owner with a now
feable 1600cc that was beyond help. We located a decent single-port 1600 in need of a rebuild, and
I decided to rebuild this one myself. All of the engine tin was powder coated with satin finish black,
and the intake manifold was powder coated a medium gray.
An original '61 air cleaner setup was installed to retain the vintage look,
and to keep the oil temp down, I changed the engine to a "dog house" oil cooler.
To improve starting and power the camper accessories, I upgraded the electrical system to 12V. I also installed
several cig lighter sockets in the cabinetry as "power take-offs" to power plug-in accessories like a 12V
coffee maker (brew that first pot, while you're still laying in bed, oh yeah!), or charge our cell phone. Now we have
no problem powering the stereo or starting the engine.
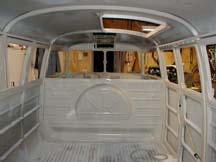
Before installing the interior, I sanded the walls, ceiling and floor and applied several coats
of water-based gloss Rust-Oleum in a medium gray. I then insulated the walls and ceiling
with FatMat sound-deadening material,
to reduce the "tin can" hollow acoustics. Next I installed thermal insulation to make it a
little warmer inside. Then I installed the
wiring for the ceiling dome lights and the 2 "clam shell" wall lamps, and also ran wiring for
an extra ceiling dome light in the rear hatch area. Then it was time
to panel the walls and ceiling. For the ceiling, I used 1/8"
Baltic Birch plywood since I was going to have to bend it to fit the curvature of the roof. I used the
old ceiling panel that came with the camper parts from the '57 Westy as a
pattern, and
after a lot of cutting and fitting, I was able to wrestle the ceiling plywood into place by bending it
into a slight 'S' shape and then "snapping" it into place against the ceiling bows.
This main piece of ceiling paneling goes from the edge of the cab area
lengthwise toward the rear end of the bus,
but it stops before reaching the curved corners at the end of the bus.
I had no pattern for this 2' piece of plywood that completed the ceiling and this turned out to be
one of the most difficult parts of the interior. This piece had to curve at each end and also curve
down to the lip over the rear hatch. I first made a template out of cardboard and adjusted it
to fit the necessary bends. I then used this template to cut out the plywood
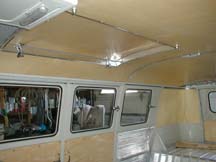
panel, but still this
piece took a surprising amount of time to get right.
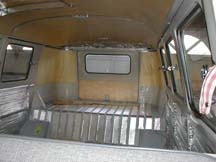
The walls were much easier, and consisted of 1/4" Baltic Birch plywood installed lengthwise and screwed
to the side ribs with small brass flat-head screws. The walls are 5' tall, so
I ran one piece with its full 4' width then a 1' piece (to conceal this horizontal joint I routed
a lap-joint in the edge of the two pieces).
In original Westy interiors, the ceiling joints are covered with a narrow piece of aluminum trim
attached with small flat-head screws, and fortunately I was able to salvage these pieces of trim
from the old '57 Westy interior.
For the floor, I laid down a layer of 3/8" "aircraft" plywood (attached only through the cup that cradles
the fold-up table's aluminum leg, just like Westfalia did it),
and then glued a sheet of vinyl flooring to this plywood. Building the new Westy interior
was very satisfying, but it took over 12 months of long evenings and full weekends to complete.
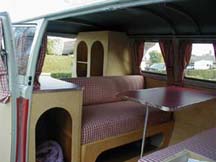
For the countertop and fold-down table surfaces, I decided to use plastic laminate.
I found a great "tomato soup red" color made by Wilson Art, with a suede finish,
that was a close match to the Sealing Wax red paint. For edging, I located chrome ribbed-plastic
'T-molding' at Armor-Top that really completes the "diner" feel of the interior.
I had some laminate and
birch plywood left over so I crafted a pair of cool portable speaker cabinets for the rear area, and a custom
pull-out table top (supported by adjustable legs) that can be set-up for occasional cooking
chores, and then neatly stowed away at the back of the bus when not in use.
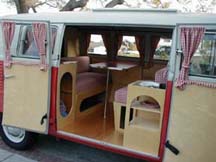
For the upholstery, I turned the bus over to Octavio's Upholstery in Orange. In the cab area,
we wanted a more "deluxe" look than a standard camper, so Octavio covered the front seat, door panels,
ceiling panels,
front kick panels and visors with a gray tweed and vinyl combo. My
wife found a light-weight canvas fabric in a red checkered pattern that nicely matched
the Sealing Wax red paint, and Octavio used this material to
upholster the back seats. My sister-in-law used this same checkered fabric to sew up all the curtains
(thanks Steph!), with curtain rod pockets in all the right places. Using original Westy curtain rod
pieces I picked up at local swap meets, I made a complete set of curtain rods with the Westy-correct
S-bends.
When I bought the bus, it was rolling on incorrect 14" wheels. I located a set of the correct
15" "square slot" bus wheels, replaced the broken hub cap clips and then had EMBEE powder coat them,
along with the bumpers. EMBEE actually had a "VW White" that was a very close match to the
Silver-White (L82) paint originally used by the factory. I used Orange County Plating to re-chrome the
door handles and other chrome parts,
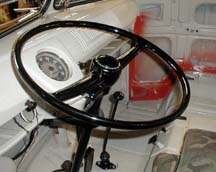
and the steering wheel and horn button were restored (in black) by Koch in Saugus.
The vintage California
yellow license plates were located in an antique store in Washington and restored
by Mojo Artworks in West Virginia (www.mojoartworks.com) to like-new
condition. To match the black steering wheel, dash knobs and wind wing latches,
I scoured the swap meets and was able
to assemble a set of rare '63 Double Cab pop-out latches with black (instead of ivory) knobs.
Bringing this Westfalia Camper back to life, was a long and expensive journey, that wouldn't
have been possible without the constant help and encouragement of the local parts suppliers and
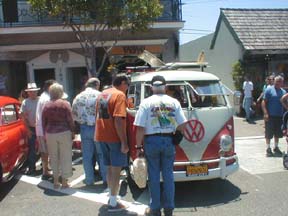
our circle of VW friends - thanks guys! Since completing our Westy, we've received 1st Place awards
at the VW Classic 2 years in a row, a 1st Place Award at the Huntington Beach Cruiser Meet in 2006, and
awards at several other local shows.
We really enjoy driving the bus to local So. Cal. shows, and especially get a kick out of all the
attention it receives at all-makes shows where it's surrounded by radical hot rods and fully
restored detroit muscle cars.
Seems like everyone has a great memory of a VW camper, and our Westy never fails to bring out the
stories and the smiles.
Dennis & Michele


